
Sourdough Bread Dough Recipe: Step-by-Step Guide
Last Updated: October 23, 2026
Quick Summary
A sourdough bread dough recipe requires just four ingredients: 500 grams bread flour, 350 grams water, 10 grams salt, and 100 grams active sourdough starter. Mix flour and water, rest for 30-60 minutes, then add starter and salt before performing stretch and folds during bulk fermentation.
- An active starter should double in size within 4-8 hours and pass the float test before use.
- The autolyse rest period of 30-60 minutes allows flour to hydrate and gluten to form without kneading.
- Perform four sets of stretch and folds at 30-minute intervals during bulk fermentation.
- Cold fermentation in the refrigerator for 8-48 hours is recommended for beginners and develops better flavor.
- Bake covered at 450°F for 20 minutes, then uncovered for 25-30 minutes until the crust is deep golden brown.
Table of Contents
- Sourdough Bread Dough Recipe: What You'll Need
- Preparing Your Sourdough Starter
- Mixing and Autolyse: Building Your Foundation
- Sourdough Stretch and Fold Schedule for Bulk Fermentation
- Easy Sourdough Bread Recipe for Beginners: Shaping and Proofing
- Same Day Sourdough Bread Recipe: Baking at the Right Temperature
- Sourdough Bread Baking Temperature: Scoring, Steam, and Oven Spring
- Troubleshooting Common Sourdough Dough Problems
- Frequently Asked Questions
Sourdough Bread Dough Recipe: What You'll Need
Making a sourdough bread dough recipe starts with gathering the right ingredients and tools. At My Rustic Roots, we believe that success begins before you mix a single ingredient. Having everything ready sets you up to focus on technique rather than scrambling mid-bake.
Ingredients and Measurements
A basic sourdough bread dough recipe requires just four ingredients: bread flour, water, salt, and an active sourdough starter. That's it. No commercial yeast, no additives, no mystery ingredients.
Here's what you'll need for one loaf:
- Bread flour: 500 grams (about 4 cups)
- Water: 350 grams (about 1.5 cups)
- Salt: 10 grams (about 2 teaspoons)
- Active sourdough starter: 100 grams (about 0.5 cup)
These measurements follow baker's percentages, which scale easily if you want to make more loaves. The flour is your base (100%), and everything else is calculated as a percentage of that weight. This approach keeps ratios consistent whether you're making one loaf or ten.
Water content matters more than most bakers realize. A 70% hydration dough (350g water to 500g flour) creates an open crumb structure. It's forgiving for beginners and produces that bakery-style texture people love.
Essential Equipment and Tools
You don't need fancy gear, but a few tools make the process significantly easier. A 13" Danish Dough Whisk with Wood Handle from My Rustic Roots is designed specifically for mixing thick sourdough doughs without the wrist strain that comes from hand-mixing. The stainless steel coil design cuts through dense dough cleanly and incorporates flour evenly.

Beyond the whisk, gather these essentials:
- Kitchen scale (digital, accurate to 1 gram)
- Large mixing bowl (at least 2-quart capacity)
- Dough scraper (a Stainless Steel Dough Scraper helps with handling and portioning)
- Dutch oven (5-7 quart capacity with lid)
- Banneton proofing basket or a bowl lined with a well-floured kitchen towel
- Lame or sharp knife (for scoring the dough before baking)
A Dutch oven is critical. It traps steam during the first part of baking, which creates oven spring and that golden crust. Without it, your loaf will be dense and pale.

Preparing Your Sourdough Starter
Your starter is the heart of any sourdough bread dough recipe. It's a living culture of wild yeast and bacteria that ferments your dough over time.
An active starter should double in size within 4-8 hours of feeding, depending on room temperature. If your starter is sluggish, it needs more frequent feedings or warmer conditions. Room temperature matters: between 70-75°F, fermentation moves at a predictable pace. Below 65°F, everything slows down. Above 80°F, fermentation accelerates.
To use your starter in a dough recipe, it needs to pass the float test. Drop a small spoonful into water. If it floats, it's ready. If it sinks, feed it again and wait a few more hours.
Mixing and Autolyse: Building Your Foundation
The autolyse is a rest period that happens before you add salt and starter to your dough. This step is where many beginner bakers skip ahead, but it changes everything.
Mix your bread flour and water together. Don't worry about making it smooth. Just combine them until all the flour is wet.
During this rest, the flour fully hydrates. The gluten network begins forming on its own, without any kneading. When you return to the dough, it will feel more cohesive and easier to work with.
After the autolyse, add your active starter and salt. Use your Danish Dough Whisk to mix everything together. The whisk handles thick dough without clogging, and the open-wire design incorporates ingredients evenly.
Sourdough Stretch and Fold Schedule for Bulk Fermentation
After mixing, your dough enters bulk fermentation. This is where gluten develops and flavor builds. Stretch and fold is the technique that replaces traditional kneading.
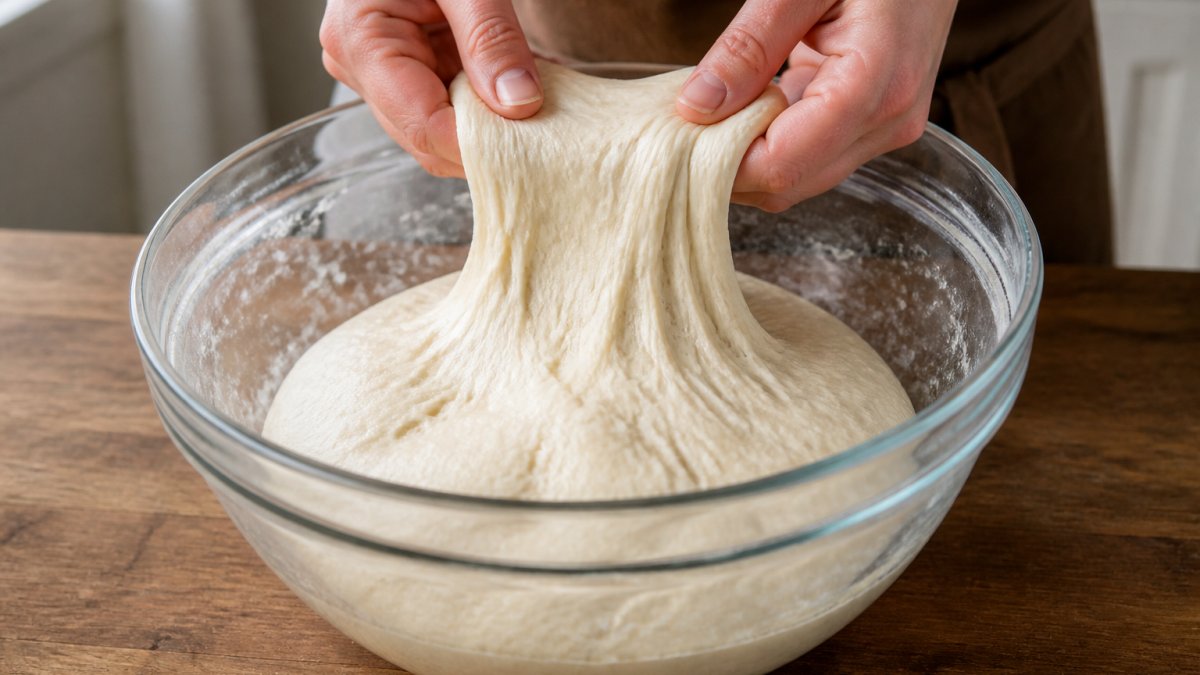
Here's the schedule for a room-temperature bulk fermentation:
- Time 0 (right after mixing): Mix is complete
- Time 30 minutes: Perform first set of stretch and folds
- Time 60 minutes: Perform second set of stretch and folds
- Time 90 minutes: Perform third set of stretch and folds
- Time 120 minutes: Perform fourth set of stretch and folds
- Time 180-240 minutes: Bulk fermentation complete (total time depends on temperature and starter strength)
To perform a stretch and fold: wet your hand, grab one side of the dough, stretch it up and fold it over the top. Rotate the bowl 90 degrees and repeat. Do this four times around the bowl.
By the fourth set, your dough should hold its shape better and show visible bubbles on the surface. This indicates that fermentation is progressing and gluten is developing.
Easy Sourdough Bread Recipe for Beginners: Shaping and Proofing
Once bulk fermentation is complete, your dough is ready to shape. This is where your loaf begins to look like actual bread.
Shaping Your Loaf
Turn your dough out onto a lightly floured surface. Use your dough scraper to help handle it without deflating it too much. A gentle touch matters here.
For a boule (round loaf), fold the dough in half, then fold the corners toward the center. Flip it seam-side down and use your hands to gently rotate it toward you in circular motions. This creates tension on the surface.
For a batard (oval loaf), fold the dough in half lengthwise, then roll it away from you, sealing as you go. The seam should be on the bottom when you place it in your banneton.
Place your shaped loaf seam-side up in a floured banneton or a bowl lined with a kitchen towel. This is your proofing vessel.
13" Danish Dough Whisk with Wood Handle - Heart →
Cold Fermentation vs. Same-Day Baking
This is where the easy sourdough bread recipe for beginners becomes flexible. You have two paths.
Cold Fermentation (Recommended): Place your shaped dough in the refrigerator for 8-48 hours. Cold fermentation develops flavor and makes scoring easier because cold dough is firm. Most bakers prefer this approach. The dough will rise slowly in the fridge, and you can bake it whenever you're ready. This is the most forgiving method for beginners.
Same-Day Baking: Skip the fridge and let your shaped dough proof at room temperature for 2-4 hours until it's puffy and shows signs of readiness. Poke it gently with your finger. If the indent springs back slowly, it's ready. If it springs back immediately, it needs more time. If it doesn't spring back at all, you've overproofed it.
Most home bakers choose cold fermentation because it's predictable and fits better into a realistic schedule.
Same Day Sourdough Bread Recipe: Baking at the Right Temperature
When you're ready to bake, preheat your Dutch oven to 500°F for at least 30 minutes. A hot Dutch oven is essential for creating steam and oven spring.
If you're using cold dough straight from the fridge, score it while it's cold.
Carefully place your dough into the hot Dutch oven. Cover it with the lid and reduce the oven to 450°F. Bake covered for 20 minutes. This traps steam and creates that characteristic crust.
Remove the lid and bake for another 25-30 minutes until the crust is deep golden brown. The color tells you when it's done better than any timer. A pale loaf is underbaked.
Sourdough Bread Baking Temperature: Scoring, Steam, and Oven Spring
Temperature control is where many home bakers struggle. Understanding oven spring and steam pressure makes the difference between success and disappointment.
Oven spring is the rapid rise that happens in the first 10-15 minutes of baking.
Steam in the Dutch oven keeps the crust flexible during oven spring. Without steam, the crust sets too quickly, and the dough can't expand.
Here's the temperature sequence:
| Step | Temperature | Duration | Purpose |
|---|---|---|---|
| Preheat | 500°F | 30+ minutes | Get Dutch oven hot |
| Covered bake | 450°F | 20 minutes | Steam and oven spring |
| Uncovered bake | 450°F | 25-30 minutes | Crust color and crispness |
| Cool | Room temp | 1+ hour | Crumb sets; easier to slice |
The internal temperature of a fully baked loaf should reach 205-210°F at the center. If you have a thermometer, use it. If not, tap the bottom of the loaf.
Let your loaf cool completely on a wire rack before slicing. This is hard to do, but the crumb is still setting. Slicing warm bread results in a gummy interior.
Troubleshooting Common Sourdough Dough Problems
Even with the right technique, things go wrong sometimes.
Dense, gummy crumb: Your dough was underproofed or underbaked. Underproofed dough doesn't have enough bubbles.
Flat loaf with minimal oven spring: Your starter may be weak, or your shaped dough overproofed.
Sticky dough that's hard to handle: Your hydration is too high, or your flour is too weak.
Starter won't rise: It's either too cold or too weak. Ensure your kitchen is at least 68°F.
A common mistake is expecting perfection on the first try. Every oven is different.
Baking sourdough bread at home is absolutely learnable, even if your first attempts didn't work.
My Rustic Roots makes this process easier with tools designed specifically for sourdough.
Frequently Asked Questions
Can I bake sourdough bread dough the same day I make it?
Yes. A same day sourdough bread recipe works when you use an active, recently fed starter and warmer room temperatures (72-78°F). Skip the overnight cold fermentation and instead bulk ferment for 4-6 hours at room temperature, then shape and proof for 1-2 hours before baking. The dough won't develop as much tangy flavor as a cold-fermented loaf, but it will still rise well and bake into a chewy crumb with good oven spring.
How do I know when my sourdough dough is ready to shape?
Your dough is ready when it has increased by 50-75% in volume, feels airy with visible bubbles throughout, and jiggles slightly when you move the bowl. The surface should look slightly domed. Press a floured finger into the dough; if the indent springs back slowly (taking 1-2 seconds), it's ready. If it springs back immediately, fermentation needs more time. If it doesn't spring back at all, you've overfermented.
What should my sourdough bread baking temperature be?
Bake sourdough bread at 450-500°F. Start at 500°F with steam for the first 20 minutes to maximize oven spring and crust development, then lower to 450°F for the remaining 20-30 minutes until the crust is deep golden brown. Internal dough temperature should reach 205-210°F when fully baked. If your oven runs hot, start at 475°F. Always preheat your Dutch oven for at least 30 minutes.
Why does my sourdough dough feel sticky or too wet?
Sticky dough usually means your hydration is too high for your flour type or room temperature. Bread flour absorbs more water than all-purpose flour; if you switched flours, reduce water by 5-10%. Room temperature also matters: warmer dough ferments faster and feels looser. If your kitchen is above 75°F, reduce starter amount or shorten bulk fermentation. You can also use a slightly stiffer dough (lower hydration) until you get comfortable with handling wetter doughs.
