
How to Get an Ear on Sourdough for Beginners
Table of Contents
- What Is a Sourdough Ear and Why It Matters
- How to Score Sourdough Bread for Maximum Ear Development
- How Deep to Score Sourdough for a Pronounced Ear
- Why Sourdough Doesn't Get an Ear: Diagnosis and Fixes
- Best Lame for Sourdough Scoring: Choosing the Right Tool
- Step-by-Step Workflow: From Shaping to Scoring
- Frequently Asked Questions
Last Updated: October 11, 2026
What Is a Sourdough Ear and Why It Matters
A sourdough ear is the flap or ridge of crust that forms along the scoring cut on top of your loaf when steam pushes the dough up through the score during the first few minutes of baking. It signals proper gluten development and creates that signature artisan look you see in bakery windows.
The ear controls how your loaf expands. Without a score, your bread splits unpredictably. With a good score and proper ear, the dough opens exactly where you want it to. That's why how to get an ear on sourdough for beginners starts with understanding what you're actually trying to achieve.
The ear separates loaves that look professional from ones that look flat and dense. Learning to create one reliably is a turning point in your sourdough journey.
How to Score Sourdough Bread for Maximum Ear Development
Scoring is cutting your dough with a sharp blade before baking. It guides expansion in a controlled direction; without it, steam builds pressure randomly and your loaf cracks unpredictably.
The goal is a cut deep enough to guide expansion but angled to form an ear. Most beginners score too shallow (no ear) or too deep (flap tears). The sweet spot is 1/4 to 1/2 inch deep at 30 to 45 degrees.
Blade Angle and Positioning
Blade angle changes everything. A steep vertical cut (90 degrees) opens straight up with no ear. A shallow angle (15 to 20 degrees) creates a flap but risks tearing if dough isn't strong enough.
The best angle for beginners is 30 to 45 degrees, creating enough flap while keeping it attached. Let the blade do the work with one smooth motion; don't force it or saw back and forth.
Position your cut slightly off-center near the top edge for the most dramatic ear. Dead center cuts create a ridge instead of a flap.
The Two-Pass Scoring Technique
Many bakers use two cuts: a main ear cut (deep, angled) and a secondary decorative cut (shallower). The decorative cut might be a leaf pattern, wheat stalk, or simple line.
Make one clean, confident stroke at 30 to 45 degrees for your main ear cut. A single smooth motion creates a clean edge that opens properly. Add decorative cuts after, keeping them shallow (about 1/8 inch) so they don't interfere with ear expansion.
How Deep to Score Sourdough for a Pronounced Ear
Score depth directly controls whether you get an ear or flat opening. Too shallow and dough lacks a clear path; too deep and the flap tears instead of standing up.
For how to get an ear on sourdough for beginners, aim for 1/4 to 1/2 inch deep on your main ear cut (roughly pencil to thick marker thickness). Your blade should penetrate with confidence but not violently; the dough should feel like cutting through butter.
Wet dough needs shallower cuts (closer to 1/4 inch); firmer dough can go to 1/2 inch. Start at 3/8 inch if unsure.
The angle matters as much as the depth. A shallow angle (30 degrees) with 1/2 inch depth creates a dramatic ear. A steep angle (45 degrees) with the same depth creates less of a flap. Experiment with one variable at a time so you know what's actually making the difference.
Why Sourdough Doesn't Get an Ear: Diagnosis and Fixes
If you're scoring correctly but still not getting an ear, the problem is usually not your technique, it's your dough. Three things prevent ears from forming: weak dough, wrong fermentation timing, or insufficient oven heat.
Dough Strength and Gluten Development
Strong dough stands up to the blade and pushes through the score during baking. Weak dough collapses or tears. You build dough strength through gluten development, mixing, stretching, and folding your dough during bulk fermentation.
Most beginners don't do enough stretches and folds in the first 2 to 3 hours of fermentation. Your dough should feel tighter and smoother after stretching than it did before. Do 4 to 6 sets of stretches and folds, spaced 30 minutes apart. After each set, your dough should feel noticeably stronger.
If your dough is shredding when you score it or tearing instead of opening cleanly, it needs more gluten development. Go back to your bulk fermentation and add more stretch-and-fold sets next time. Weak dough also won't hold its shape during shaping, so if your shaped dough is slouching or spreading, that's another sign you need more stretching.
Hydration and Fermentation Timing
High hydration dough (75% to 80% water) is harder to handle and score cleanly. If you're new to scoring, start with lower hydration (70% to 75%) so your dough is firmer and easier to control. You can work your way up once you're comfortable with the technique.
Fermentation timing matters too. Overproofed dough (left to rise too long) is too soft to hold a score. The dough collapses into the cut instead of pushing through it. Underproofed dough (not risen enough) has too much tension and might tear when you score.
Your dough should jiggle slightly when you poke it but spring back slowly. If it springs back immediately, it's underproofed. If your finger leaves a dent that doesn't bounce back at all, it's overproofed. Aim for that middle zone where it jiggles but still has some spring.
Oven Temperature and Steam
Your oven needs to be at least 475°F for a good ear. Below that, your dough doesn't get enough oven spring to push through the score. A Dutch oven traps steam, which helps the dough expand before the crust sets. If you're baking without steam, your crust hardens too fast and the ear can't form.
Preheat your Dutch oven for at least 45 minutes. When you put your dough in, the heat and trapped steam work together to create oven spring. Bake covered for the first 20 to 25 minutes, then uncover for the last 20 to 25 minutes so the crust browns.
White Magnetic Retractable Bread Lame & 5 Razor Blades | Artisan Bread Scoring →
Best Lame for Sourdough Scoring: Choosing the Right Tool
A bread lame is a tool with a sharp blade designed specifically for scoring dough. It gives you more control than a knife and creates cleaner cuts.

The White Magnetic Retractable Bread Lame from My Rustic Roots includes five stainless steel razor blades and a scoring guide. The magnetic design makes changing blades quick and simple, and the retractable cover keeps you safe.
A wooden bread lame is another option. It's simpler and lighter, which some bakers prefer. But a retractable lame gives you more control over your blade angle and depth, which matters when you're learning.
The blade itself matters more than the handle. Your blade needs to be sharp. A dull blade drags through dough instead of cutting cleanly, which tears the gluten and ruins your ear. Replace your blade whenever it starts dragging instead of slicing.
Step-by-Step Workflow: From Shaping to Scoring
Preparing Your Dough Before Scoring
Your dough should be cold and firm when you score it. Many bakers chill their shaped dough overnight in the refrigerator. Cold dough is easier to score because it's less sticky and holds its shape better.
Take your dough out of the fridge 30 minutes before you bake. This brings it closer to room temperature so it bakes evenly. You want it cold enough to handle cleanly but not so cold that it doesn't rise in the oven.
Dust your dough lightly with flour just before scoring. This helps your blade glide smoothly across the surface instead of sticking. Use just enough flour to dust it, too much flour gets in the way.
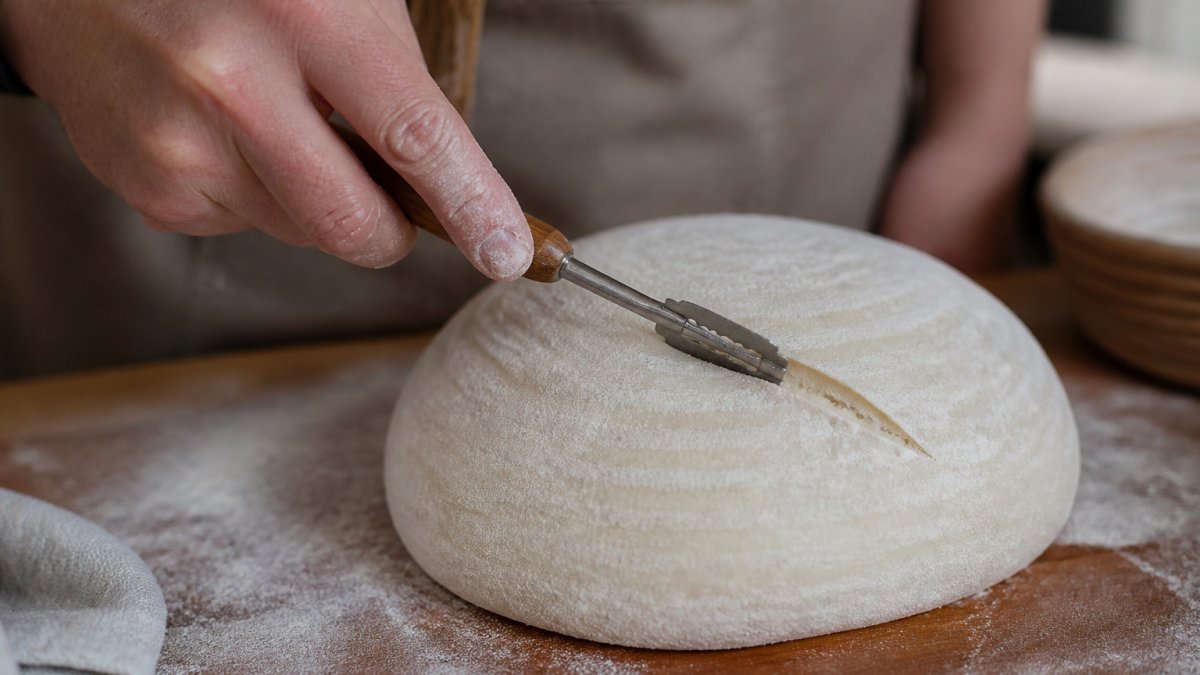
Scoring Technique in Action
Place your dough on a work surface or bread peel. Hold your lame at your chosen angle (30 to 45 degrees for an ear). Position the blade near the top edge of the loaf, slightly off-center.
Make one confident, smooth stroke from top to bottom. Don't hesitate, don't saw back and forth, and don't press hard. Let the sharp blade do the work. A good score takes less than a second. Your cut should be clean and clear, not ragged or torn.
If you're adding a second decorative cut, do it now while your lame is already in your hand. Keep this cut shallower and place it where it won't interfere with your ear.
Once you've scored, transfer your dough to your preheated Dutch oven immediately. Don't let it sit, the longer it sits, the more it dries out and the less it will expand in the oven.
Common Mistakes to Avoid
The biggest mistake is hesitating mid-stroke. When you pause or change direction while scoring, you create a ragged cut that doesn't open cleanly. Commit to your stroke and follow through.
The second mistake is pressing too hard. You're not trying to cut all the way through the dough, you're just opening the surface. Light, confident pressure is better than heavy pressure.
The third mistake is scoring dough that's too warm. If your dough is at room temperature and hasn't been chilled, it's too soft to score cleanly.
The fourth mistake is using a dull blade. A dull blade is worse than a sharp knife because you'll press harder to compensate, and you'll still get a ragged cut. Replace your blade regularly.
Getting an ear on your sourdough is one of the most satisfying moments in home baking. It's proof that your dough is strong, your timing is right, and your technique is working.
USDA guidance on fermented foods and food safety
King Arthur Baking Company's sourdough techniques resource
Food Science Institute research on gluten development
Frequently Asked Questions
What is an ear on sourdough bread?
A sourdough ear is the flap of crust that stands up along the scoring cut when the loaf expands in the oven. It forms when you score the dough at an angle before baking. The ear happens because the blade creates a weak point where the dough can expand upward and outward, and the flap curls back as steam escapes. A pronounced ear is a sign of good oven spring, proper dough strength, and correct scoring technique.
How deep should you score sourdough to get an ear?
Score about 1/4 to 3/8 inch deep for the main expansion cut. The depth matters less than the angle, a shallow cut at a sharp 30-45 degree angle will create an ear, while a deep vertical cut may not. Aim for consistency: too shallow and the dough won't have a clear path to expand; too deep and you risk cutting through the gluten structure. Start at 1/4 inch and adjust based on your results.
Why isn't my sourdough getting an ear?
The most common causes are weak dough strength, incorrect blade angle, or insufficient oven spring. If your dough is underproofed or lacks gluten development from stretch and folds, it won't have the tension to form a crisp ear. Also check your blade angle, it should be 30-45 degrees, not vertical. Make sure your oven is fully preheated and you're using steam (a Dutch oven works well) to give the dough room to expand before the crust sets.
What tool is best for scoring sourdough?
A bread lame with a sharp razor blade gives you the most control. The My Rustic Roots Retractable Magnetic Bread Lame includes five stainless steel blades and a scoring guide, making it ideal for beginners. The retractable design keeps the blade safe when not in use. A sharp blade is critical, dull blades tear the dough instead of cutting cleanly, which ruins the ear. Replace blades when you notice resistance.